|
Hand Tooling
When working with metal and trying to get precision a few tools will ease the work. Most are possible to buy, but are often quite expensive and not really too complicated to make. Much can be made using only hand tools, but access to a lathe will make working so much better. The tools below are the ones I have seen as required and made myself.
Surface Plate
To be able to mark out with precision you need a completely flat surface. I got myself such a surface using a granite tile set into a concrete base in a shallow tray. When all dry I mesaured the flatness and found it to be as flat as I desired.
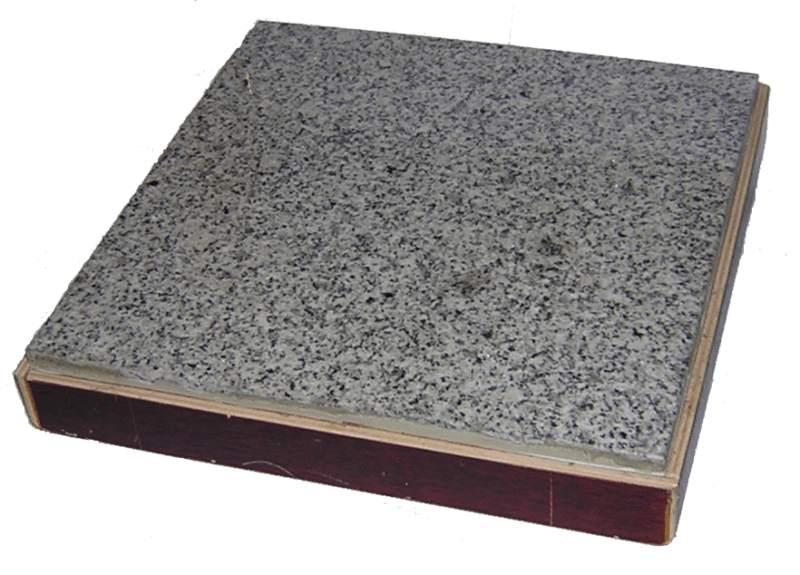
Instead of the granite tile you can also use some 10 mm thick plate glass that will work equally well. The expensive solution is to buy a ready-made surface plate of eiother granite or cast iron.
Today my surface plate has been built into one of the rolling cabinets to get better protection and storage, see Benches and Storage.
Surface Gauges
As an aid to draw lines I use a surfacae gauge, a tool with a scribes on a pole can make a horizontal line on a specific height on the surface of a job. Used on top of a surface plate, the line is both truly straight and at the same height. A simple tool to make and very useful.
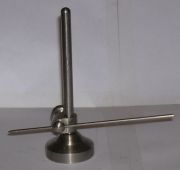 Here we can see the small surface gauge. I made one more which is a little larger. This small one is suited for small work where it is possible to scribe a line onto the surface. The surface is first covered with a marker and the scratched/scribed line will appear as a clear line on the marker coloured surface. Here we can see the small surface gauge. I made one more which is a little larger. This small one is suited for small work where it is possible to scribe a line onto the surface. The surface is first covered with a marker and the scratched/scribed line will appear as a clear line on the marker coloured surface.
If a pencil line is desired, I use the larger gauge that have a pencil adaptor fitted.
Cutting or Marking Gauges
A marking gauge is a very handy tool for marking a straight line along an edge of a board or a plate. It works just like the marking gauge used in woodworking in school with the difference that this one is made in steel.
The needle is 2 mm diameter and is secured by a 2 mm set screw in the end of the bar. The bar is 4 mm diameter and the body is 15 mm diameter with an M4 screw to lock the bar in place. The whole thing does not take long to make and is very useful.
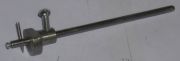
Depth Gauge
In some cases it is necessary to measure the depth of a blind hole or a recess. Then a depth gauge is a very handy tool and easy to make.
I started with a piece of brass. Gave it some shape, added a lock screw and a 2 mm rod as gague rod. The gauge was made with a relatively large "foot" to reachs over larger holes.
Measuring is done by placing the foot above the "depth", release the lock screw and push down the rod till it bottoms. Lock the rod, bring up the gauge and measure the depth using a caliper. Easy, functional and very well working.
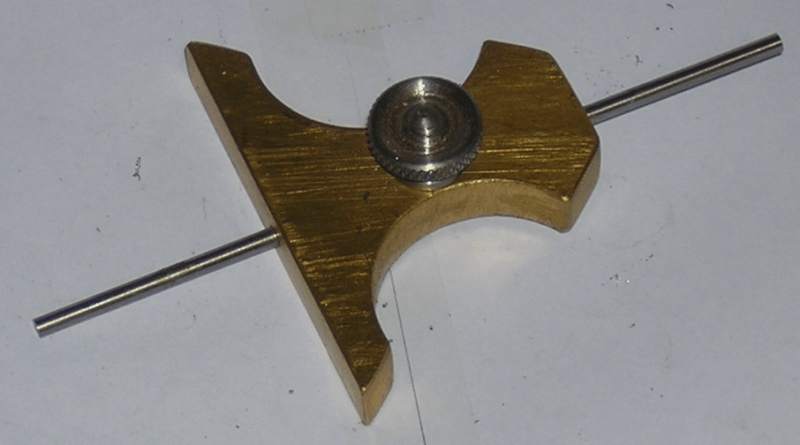
A Round Precision Angle
This measurement aid is made using the lathe. By the fact that the carriage and cross slide are exactly perpendicular to each other it means that a piece of metal first lightly smoothened along its length and then the end faced off will make those two surfaces be at exactly right anlge to each other. This is very useful when the precise perpendicularity is important, on a milling table for example. A hole through the precision angle makes it easy to secure the the milling table as well.
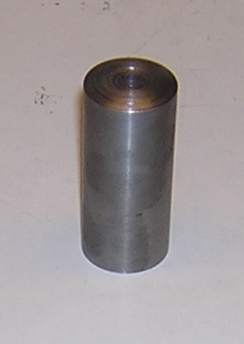
This is a seemingly simple tool but by using the built-in facilities of a lathe the result will be a true precision tool to be handled accordingly. Lightly oiled for protection and stored away from dings and scrathes.
When at it, make two, Then it willb e easy to set up work so that two faces are at right anlges to each other as well as to the surface it has been fastened to. The size of mine are 24 mm diameter and about 70 mm long with a 6.5 mm hole right through.
Parallell Clamps
The universal tool of the toolmaker. Has an endless range of uses and a grip that few other tools provide. It is also extremely easy to make frpm some square bar and threaded rod.
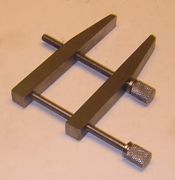
Parallell clamps are preferably made in pairs and in more than one size. This is useful in the long run. In my box there is one pair of 75 mm length and one pair of 120 mm length. Both with 6 mm screws. For times when more gripping force is needed, the screws can have a cross-hole to use a tommy bar for tightening.
There are two main models of parallell clamps, one as shown in the picture and the other having a "foot" that makes it able to stand on top of a surface without any screws getting in the way. This increasesd their usability even more.
A Simple Pillar Tool for Threading
To avoid broken taps it is very useful to have a stand of some kind to avoid the sideways forces when hand threading. As the tap is fitted to the stand, the risk of those sied forces breaking the tap is basically removed and you also get a better control of the tapping process as such. To make this stand a lathe is required.
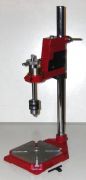
I used a cheap but sturdy electric hand drill stand as base for the modification. We need a new insert where the electric drill normally is fitted together with a a short shaft with a hand crank and a small drill chuck for the taps. The taps are mouted in the drill chuck and the work turns out much simpler and safer.
The stand in the picture have a drill chuck for 10 mm drills or taps which well covers my hobby work. To turn the chuck I have made a large knob with two short tommy bars for increased turning force. Using the tommy bars it is no problem to tap 10 mm threads provided that thread cutting oil is used. It also saves the tools and improves the thread result.
Universal Pillar Tool
This is a more developed version of the simple tapping tool with more functions, but also more complex to make. For this tool I have also made a light attachment to provide good work light.
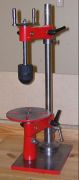
The pillar tool is not only a tapping tool but also used for letter and number stamping, riveting and other work. All depending on what is fitted to the arms. In the picture it is set up for tapping.
For smaller taps there is a smaller spindle to allow tapping of threads less than 1 mm diameter. For stamping, the table is changed to a heavier or turned aside with a stamp holder in place of the spindle. For riveting both the table and holder are changed to appropriate tools.
Model Building Board
I made this board long ago to be able to sit by the kitchen table and work with models and then easily move/remove it when done. The board has a plywood bottom and an A3 size cutting mat on top. On the plywood I mounted a front edge that goes down to grip the table edge thus preventing the board to move over the table. Added side edges at cutting mat height and at the back a somewhat higher and sturdier edging onto which a second strip was mounted. A simple finishing at the left end for connecting power to the rail pieces. This board does a good job still today.
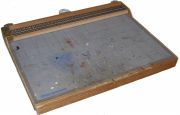
If you do not want a loose work lamp, it is quite easy to fit one to the back edging. The mount is seen at the beck center. I use a small magnification lamp as light source. It will also help the show the smaller details well. The board has been in use for the past 20 years and I find nothing to improve as it looks now. Very recommandable.
A Dual Soldering Iron Stand
In my work shop I use both traditional soldering irons, a pen iron at 25 W and a larger one at 40 W as well as a modern cermaic one with adjustable temperature. The new one has a built-in support, while the older ones have to be somewhere during work.
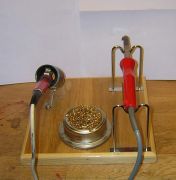 That is why I made this stand with room for both of the older irons. A spring stand for the pen iron and a couple of oven pan grill supports for the other. The grill supports were slightly trimmed before used. Now I have both irons safely supported in omne place! The cup in between contains a brass "swarf"-ball to use for cleaning the tips. That is why I made this stand with room for both of the older irons. A spring stand for the pen iron and a couple of oven pan grill supports for the other. The grill supports were slightly trimmed before used. Now I have both irons safely supported in omne place! The cup in between contains a brass "swarf"-ball to use for cleaning the tips.
The bottom is a piece of oak wooden flooring with edges of oak strips and varnished to be more durable. Easy to make and very useful.
Stand for Screwsdrivers
Earlier there was in principle just screwdrivers for slotted and Phillips head screws. Today the variants are several more; Slotted, Phillips, Pozidrive, Hex, and TORX. So to keep them at hand and easily found according to size and type, I made a stand for all of them.
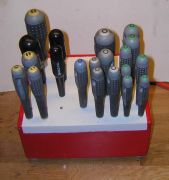
I a simple and efficient wayn they are placed in size and type. I prefer BACHO screwdrivers and they are also colour coded, yellow for slotted heads, red for Phillips heads, blue for Pozidrive heads, white for hex heads, and green for TORX heads. The smallest at the front and the larger at the back. Works perfectly!
It is all made from left-overs and the placing is to group them as logical as possible.
|