Some work like winding a spring or cutting a short thread demand that the spindle speed is low. Definately lower than what my C3 lathe can run. So to avoid problems and risks, a hand crank is a handy additional accessory. It will provide the low speed and the better safety needed.
To make such an accessory the requirement is that it must also be easy to attach to the lathe, and preferably, the handle should be very easy to remove when having to run the lathe by motor.
CAUTION!
NEVER EVER RUN THE LATHE BY MOTOR WITH THE HANDLE FITTED!
The handle is a danger and should be regarded as such at all times!
Furthermore, it is unbalanced which will make the machine jump around and even further increase the danger for damage on anything in the machine surroundings!
Remove the handle before turning on the machine for motor driven work!
I made an extension to the spindle long enough to clear the change wheel cover and its thumb screws. The extension is secured inside the spindle in the same way as my dividing attachement, that is by using a split sleeve and a conical expansion nut inside the sleeve. The conical nut is pulled in by a long M6 screw (MC6S x 90).
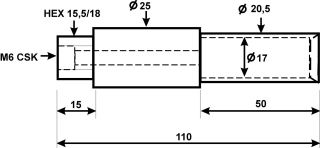
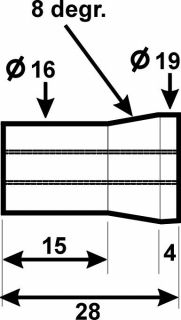
Fig 1: The Extension Axle and the Conical Nut
The screw is countersunk into the outer end of the extension and is easily tightened using a 5 mm hex key. Both the spindle extension and the conical nut are made from BMS, and the finished parts are shown in Fig 2 below.
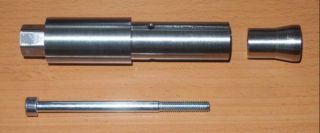
Fig 2: Spindle Extension, Screw, and Nut
The crank itself is in my case a salvaged part from a big old hand drill with two speeds. The crank had a hex "hole" to attach it to the drill body, and i simply re-used that. The crank is then secured to the hex part with a thunb screw. Simple, works well and is fast to set up and remove.
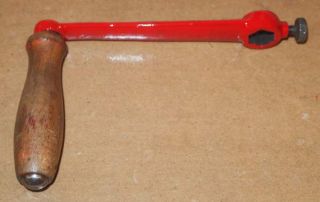
Fig 3: The Crank
Fig 4 shows the assembled accessory fitted to the lathe.
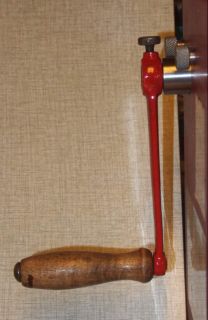
Fig 4: The accessory fitted to the lathe.
Hope it gave some ideas.
And finally:
NEVER EVER RUN THE LATHE BY MOTOR WITH THE HANDLE FITTED!
Det är typiskt sådana här enkla detaljer man saknar som tillbehör men de är trots allt lätta att göra själv.
/Peter